“Rain, mud, gas shelling and constant bombardment. I had never seen such a scene nor thought it possible. The whole country was water-logged, small spits of muddy land joined shell holes great and small, full of water, many with dead men and animals, the stench of which made us retch".
Captain Philip Christison, 6th Batt, Cameron Highlanders
I mentioned a while back about the project I started to model a couple of board sections of marshy, abysmal terrain for our Great War set-up. I’d been interested for a long time in the Third Battle of Ypres around Passchendaele, and also inspired by JRR Tolkien’s fictional setting of the Dead Marshes in the “Lord of the Rings” (itself bearing echoes of Tolkien’s own experiences in the Great War). This is how I went about it.
Inspiration
The more I looked through the internet and books on the battle, two things happened, both of which had an impact on my terrain building.
First, I got progressively more depressed. It very difficult to read about Passchendaele without a sense of the misery and hopelessness suffered by troops on all sides in the battle. The photographs of the mud and the horror, even after almost a hundred years, remain shocking. Making Great War terrain for my club over the past couple of years has led to some thoughtful moments, but none more than this. I kept trying to remember that when my wargames club started our Great War terrain making project back in late 2008 we were trying to get away from the “folk memory” of Passchendaele – but looking through the books on the subject, seeing the photographs and reading the accounts of the soldiers who were there, getting away from that memory seemed somehow almost disrespectful.
Second, I was struck by the intricacy of the battle. As I read more I became interested in the incredible detail with which the main British offensives in the summer of 1917 were planned, the structure of sophisticated artillery bombardments and aerial spotting, the evolution of a flexible German defensive system, the little-known successes of the Tank Corps over abysmal terrain and the see-saw history of engagements and offensives fought over tactically important, but shattered, terrain points. Although Third Ypres was a titanic struggle involving hundreds of thousands of troops, at a small-unit scale the battle saw some critical tactical developments in both attack and defence. It was this micro-tactical, infantryman’s viewpoint which I was most interested in for wargaming.
Planning
I think that every terrain project benefits from a plan. Mine was sketched out in my notebook and translated to the finished project in about 6 weekends.
I used a couple of books extensively in the build, both of which are well written and I can recommend. They were the Osprey Fortress
“Fortifications of the Western Front” by Paddy Griffiths, and
“Pill Boxes of the Western Front: A guide to the design, construction and use of concrete pill-boxes 1914-1918” by Peter Oldham. The latter is particularly useful as it contains plans of bunkers, pillboxes and German MEBUs from the Siegfried Stellung, as well as equivalent British fortifications. More of the MEBUs in a future post! For Third Ypres, I found
Peter Barton’s book on Passchendale and Peter Hart’s book
“Passchendaele: The Sacrificial Ground” the most useful. Both have some fine first-hand accounts, although mainly from the British and Imperial perspective. For the German side, I read through
“The German Army at Passchendaele” by Jack Sheldon
After reading up on the actions and offensives of Third Ypres, I set about a plan for the terrain boards. I wanted to try and create a damp, treacherous piece of terrain with extensive flooding and crossed by a number of duckboard paths.
"Passchendaele was just a terrible, terrible place. We used to walk along these wooden duckboards - something like ladders laid on the ground. The Germans would concentrate on these things. If a man was hit and wounded and fell off he could easily drown in the mud and never be seen again. You just did not want to go off the duckboards."
Pte Richard Mercer
I also wanted to create a couple of inserts into the boards into which a pair of pillboxes could be situated without causing a problem with physical stacking of the boards. I wanted these inserts to be large enough to use for other centrepieces and gaming objectives to be built later, such as wrecked tanks, crashed aircraft and other features.
I also got together a selection of modelling materials, some of which came in useful and some which were nearly disastrous! In the photo below, there’s a large pack of “Solid Water” for the flooding effects, coarse Milliput (for sandbags), casualty figures, plastic “Corrugated iron” and a selection of resin fascine causeways. The intention of the causeways was to use these for the duckboards, tracing a path through the flooded land. I can’t have been thinking straight when I purchased these lovely pieces from Tim at
Frontline Wargaming. The fascine causeways are very reasonably priced and fine resin casts. I’ve used them a lot with my 17th Century armies. BUT….they look very out of place in 1917. Why on earth I didn’t realise this until almost too late…. Ah well, I didn’t and as you’ll see, I had to change these at the last minute to avert Roundwood’s Terrain Making Disaster™ #38 !
In the photo below, there’s some more items I used such as wooden splintered coffee stirrers, more plastic “Corrugated iron” and some cheaper corrugated cardboard, small twists of barbed wire coiled round brass picket-posts and the cardboard duckboards I finally settled on using after I removed the fascine causeways. And I also added in an arm or two from a set of Warlord Games’ WWII infantry, as you’ll see.
Building
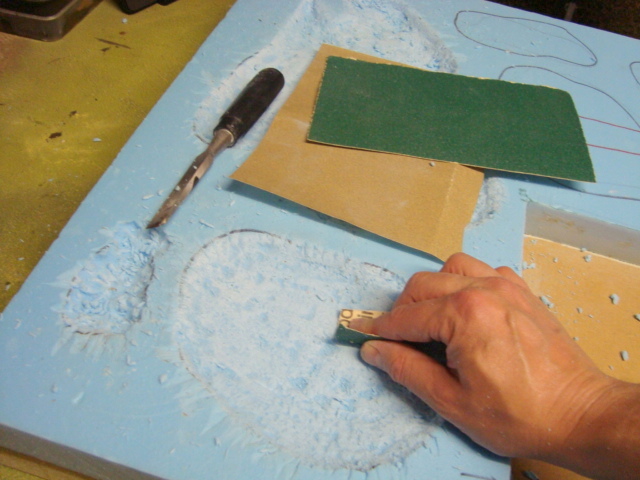
Following the craters being sketched onto the Syrofoam, I used a flat chisel to scrape away the craters to a depth of about 10 to 15mm. I was trying not to gouge deep pits into the Styrofam, mindful of having to fill the craters with Solid Water epoxy resin at the end of the project. There are a couple of deeper craters, but in the main the craters are pretty flat. I also wanted to make sure there were plenty of causeways for troop movement, and channelling of deployment, around the terrain boards.
After chiselling, I was left with a very rough surface which I then wanted to smooth out to ease painting. Some rough sandpaper did the trick, following which the first board looked like this…
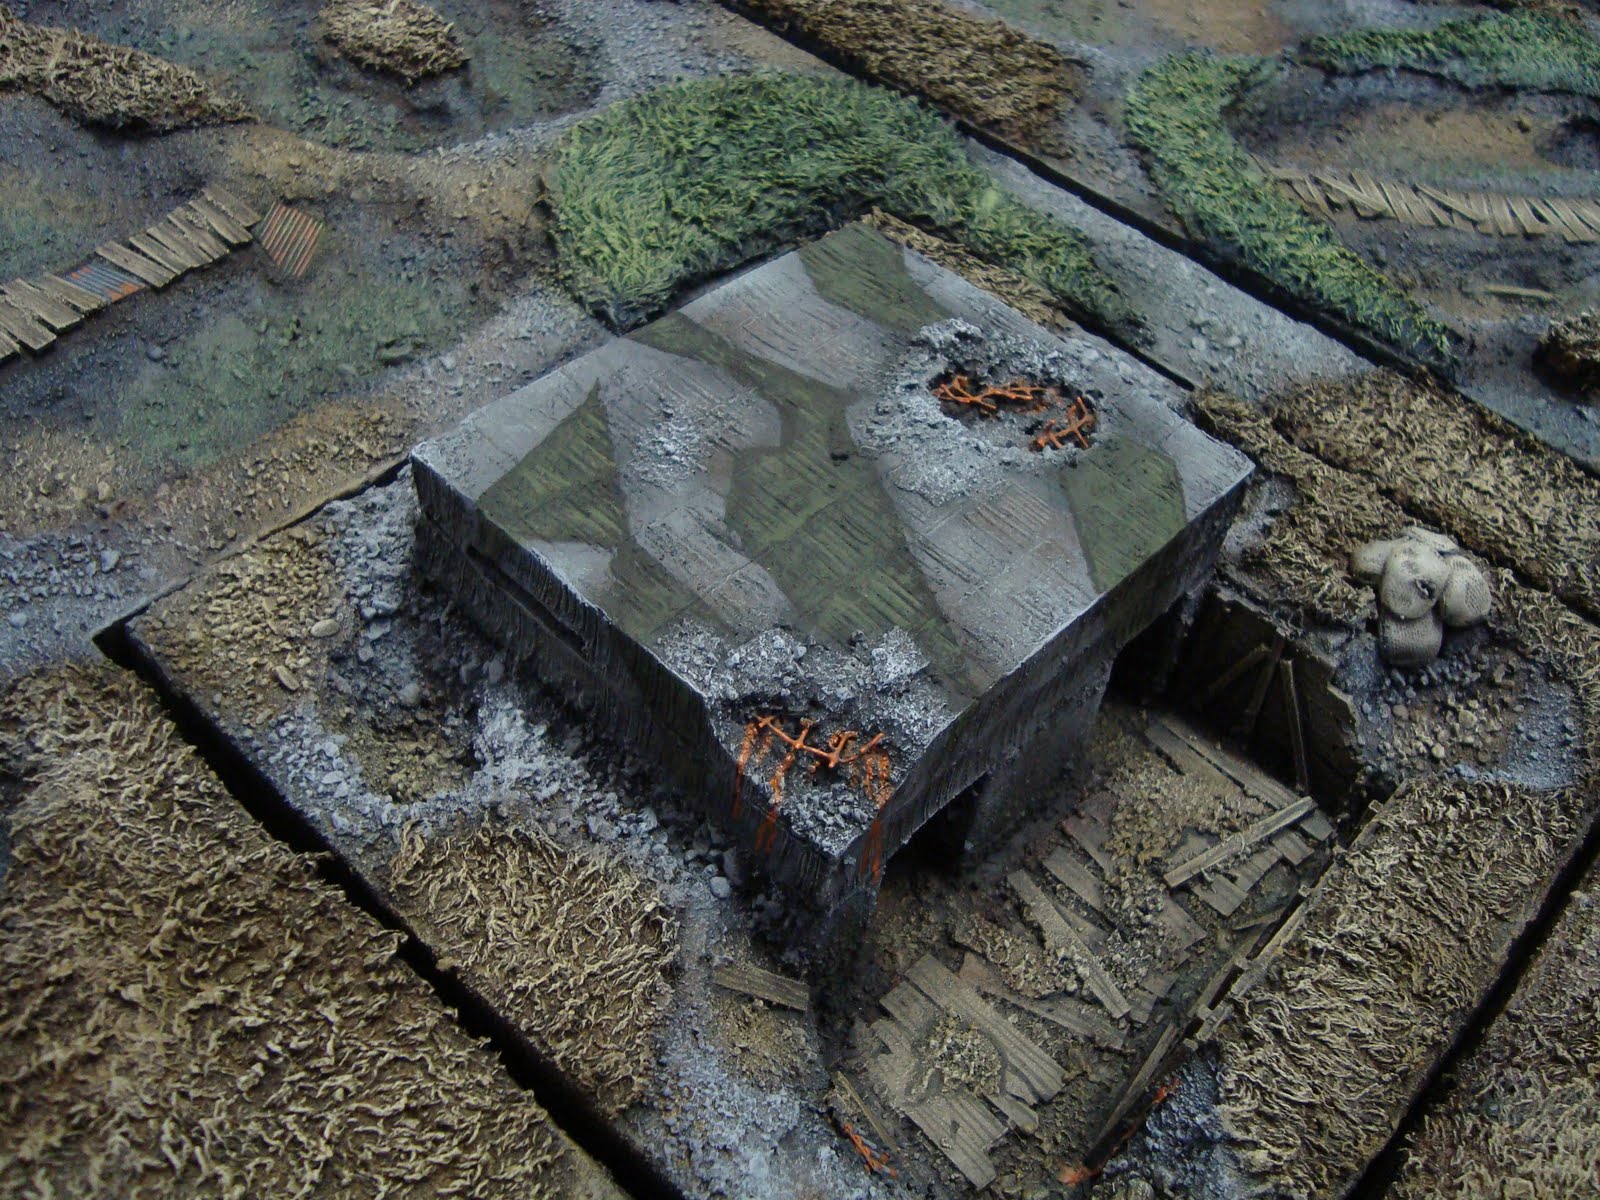
I’d cut out the insert in advance and made sure it was based on non-warp plywood (which would form the base of the trench to be dug into the insert, next to the doors of the pillbox). As usual I used a couple of spare figures to make sure that the scale of the pillboxes looked right, and to check there was plenty of room in the outside trench.
The pillbox itself was made from two Styrofoam rectangles, each with a depth of 10mm. I would it easiest to use these so I could get a clean cut out of the pillbox embrasures. I quick sand down of the top and bottom made sure these were a good fit, and I marked them clearly to make sure I didn’t end up gluing the wrong one to the bottom by accident (yes, it’s happened before).

Next, I dug out some shell damage from the roof of each pillbox, using wire mesh on the pillbox and brass wire on the other (for variation) to represent the actual wire frame of the pillboxes being damaged in an artillery barrage. (Flames of War players will immediately spot where this trick comes from – and like so much on this Blog, yes, I’m shamelessly ripping off other peoples great ideas for my own stuff!) I then went outside and used some superglue to “melt” the Styrofoam in a couple of places to represent more damage such as bullet holes and shell splinters, although in the end I found this worked slightly less well on these models than on the pillbox I’d built in the Vlissinghe terrain board in 2009. Perhaps I need to practice more!
For history buffs, the reference to “Vampir” on the first pillbox is a reference to the pillbox of that name just by the Menin Road (and yes, the spelling of “Vampir” without the “e” is right, I think!).
The trench outside the pillbox was cut out from the insert, and the insert glued over a couple of nights to the plywood base. I then added my usual revetment sides to the trench, with some battle-damage and shellholes around the edges.
As with the other trench terrain boards, I mixed up some PVA and polyfilla, coloured it with dark grey emulsion paint, spread it along the trench and scattered a mix of small stones, gravel and sand into the trench. I painted the embrasures black before gluing the pillbox bottom and top together and onto the insert.
Next up was cutting suitably coloured or dyed old towelling around the shell craters.
Then, the base of the inserts were painted with the grey emulsion coloured PVA and Polyfilla mix, set in an old plastic tub and filled with gravel and sand scatter. I covered the rest of the terrain board with the same mixture, followed by the same scatter.
Modelling the Pillboxes
Once dried, I settled down to watch a DVD, fully intending a peaceful evening carving modelling putty along the sides and roof of the two pillboxes. I’d bought some modelling putty a while back, and it had been kicking around the spares box for a while. It looked perfect. And, in many ways it was….it was flexible, easy to spread, fast drying and easy to carve with a modelling tool. However, with a couple of second of opening the tube, I quickly found out why this stuff MUST be used outdoors….the fumes from this tiny tube are incredibly strong. No harm done, but for once the (frankly scary) notices on the back of the tube needed to be taken seriously. I finished the rest of the pillbox by the outside light under a Heertfordshire sky, at arm’s length!
I didn’t think the results were that bad, giving a half-decent simulation of the ridges of the pre-fabricated concrete used by the Germans as they constructed the
Flanderenstellung. I glued a scattering of gravel and small pieces of Styrofoam to the roof of each pillbox to simulate shell damage, and scatter a thin coating of sand on that.
I also added a twist of picture frame wire in a couple of places, simulating perhaps a shattered telephone cable or electricity cable or just some wreckage on the roof of the pillbox.
The whole of the terrain boards, and the pillbox inserts were then painted with their base-coat colours….dark green and dark mud brown for the terrain, dark grey for the pillboxes.
The Flooded Land
About this time, I realised by mistake with the resin-made fascine causeways. They just did not look right. I ripped them off with some difficulty in places and re-laid cardboard, wood and plastic “corrugated iron” duckboard paths. I mention this because I sometimes feel that terrain building is a process of trial and error. Not everything works first time, and we all make mistakes occasionally. Getting over the disasters is part of the hobby. And when disaster strikes, “keep calm and carry on” are the watch-words for getting the flipping thing finished!!
I then added a couple of wire pickets to the shell craters. These were placed low enough to be partly submerged in the Sold Water, and low enough so as to not interfere with stacking the boards for storage.
I also added a couple of the arms from the Warlord Games infantry multi-part kits. I added them, part-submerged, to a couple of the craters. The more I had read about the later stages of the battle, the more it was clear that the apocryphal stories of Flanders mud were very real for the soldiers wading through the duckboard maze.
“We splashed and slithered, and dragged our feet from the pull of an invisible enemy determined to suck us into its depths. Every few steps someone would slide and stumble and, weighed down by rifle and equipment, rapidly sunk into the squelching mess. The nearest grabbed his arms, struggled against being themselves engulfed and, if humanly possible, dragged him out…..To be ordered to go ahead and leave a comrade to such a fate was the hardest experience one could be asked to endure…This was as near to Hell as I ever want to be”.
Private Norman Cliff, 1st Battalion, Grenadier Guards
At this point, the building of the terrain boards were finished. Looking fairly dark and malevolent, they awaited painting and the injection of muddy water…
“Floods of rain and a blanket of mist have doused and cloaked the whole of the Flanders plain. The newest shell-holes, already half-filled with soakage, are now flooded to the brim. The rain has so fouled this low, stoneless ground, spoiled of all natural drainage by shell-fire, that we experienced the double value of the early work, for today moving heavy material was extremely difficult and the men could scarcely walk in full equipment, much less dig. Every man was soaked through and was standing or sleeping in a marsh. It was a work of energy to keep a rifle in a state fit to use.” –
William B Thomas, The Daily Mail, 2nd August 1917